HOW TO PAINT A SUGAR SKULL FACE: HISTORY, TECHNIQUES & A STEP-BY-STEP GUIDE
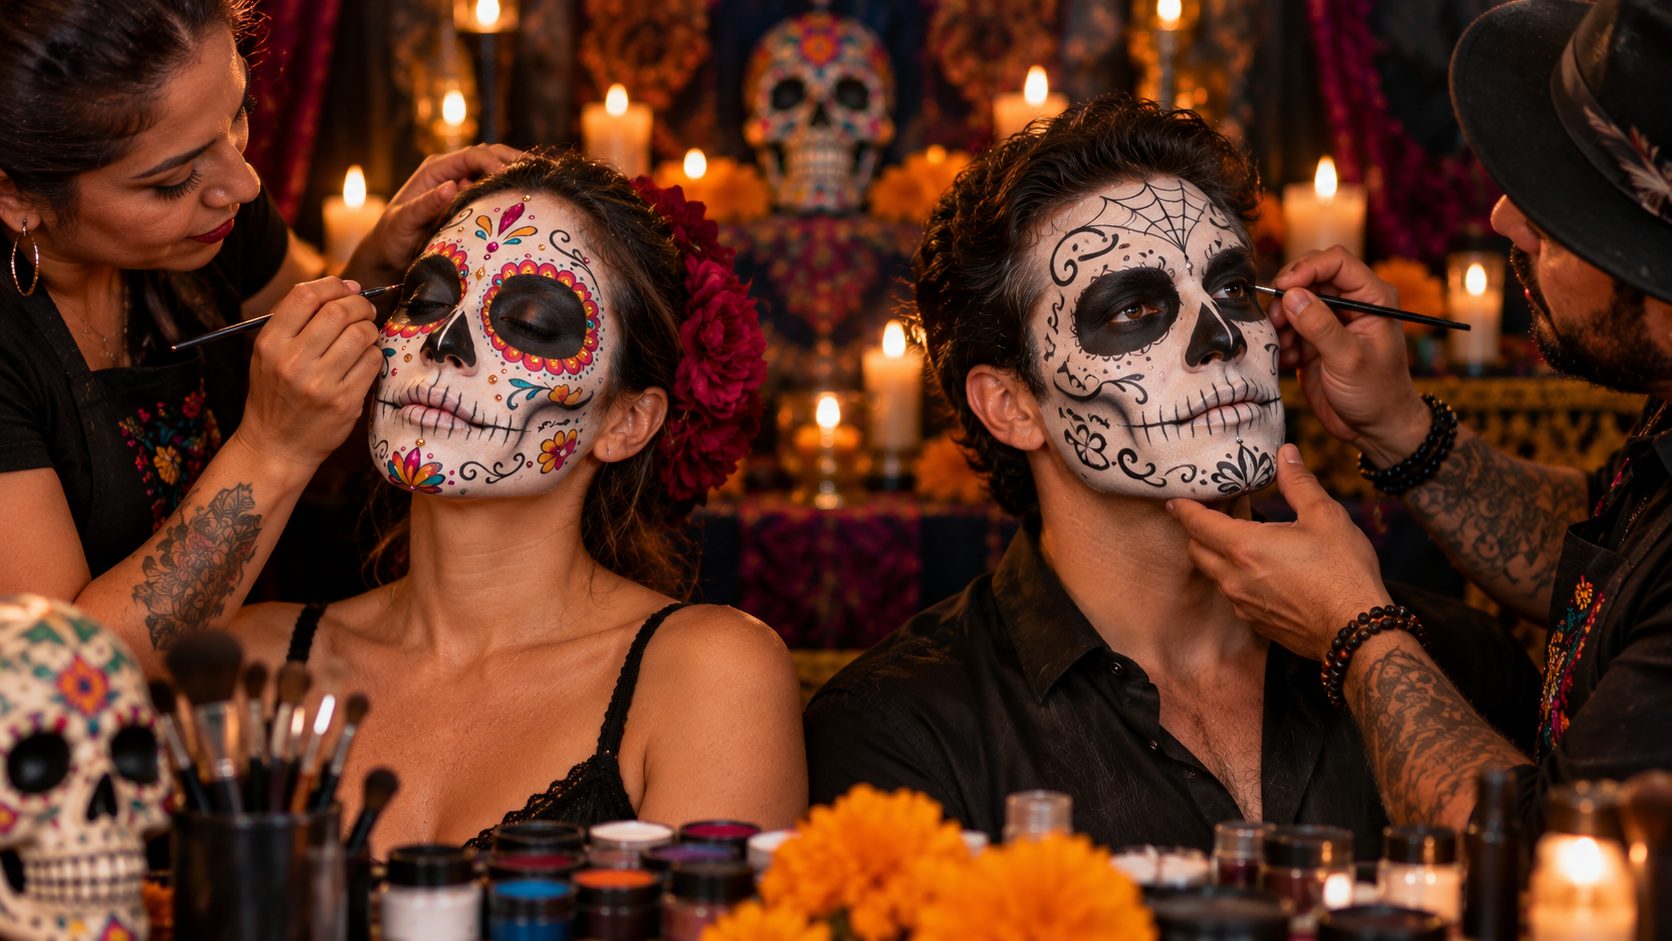
From Día de los Muertos tradition to creating a face that looks great all night, here’s how to choose the right makeup, avoid cracking, and build your design step by step.
There is no single “correct” sugar skull face.
Some designs are almost entirely black and white. Others have huge flowers surrounding the eyes, elaborate linework, rhinestones, spiderwebs, hearts, roses, marigolds, scrollwork, or dramatic skeletal shading. Some are dark and masculine. Others are delicate, colorful, and highly decorative.
That variety is part of what makes this style so interesting.
And before we get into brushes, makeup, and technique, it helps to understand what we are actually painting.
WHERE SUGAR SKULLS COME FROM
The phrase “sugar skull makeup” has become a common way to describe this style of face painting, but a much broader Mexican tradition really inspires it.
Traditional calaveras de azúcar, or sugar skulls, are decorated skulls associated with Día de los Muertos and are often placed on ofrendas. The Día de los Muertos traditions practiced today developed over centuries through a blending of Indigenous beliefs, Catholic observances, and regional Mexican customs.
The skull imagery is important, but not because it is meant to be frightening in the Halloween sense.
Día de los Muertos is about remembering and welcoming those who have died. Death can be treated with sadness, of course, but also with affection, humor, beauty, and celebration.
Another major influence on the imagery we now associate with Día de los Muertos is Mexican illustrator José Guadalupe Posada, whose satirical skeletons and calaveras became enormously influential. His elegant skeletal woman, later known as La Calavera Catrina, became one of the most recognizable visual symbols of the holiday.
So while modern face painting is connected to traditional sugar skull imagery, painting a face like this isn't the same as creating a traditional calavera de azúcar.
That distinction matters.
THERE IS NO SINGLE SUGAR SKULL DESIGN
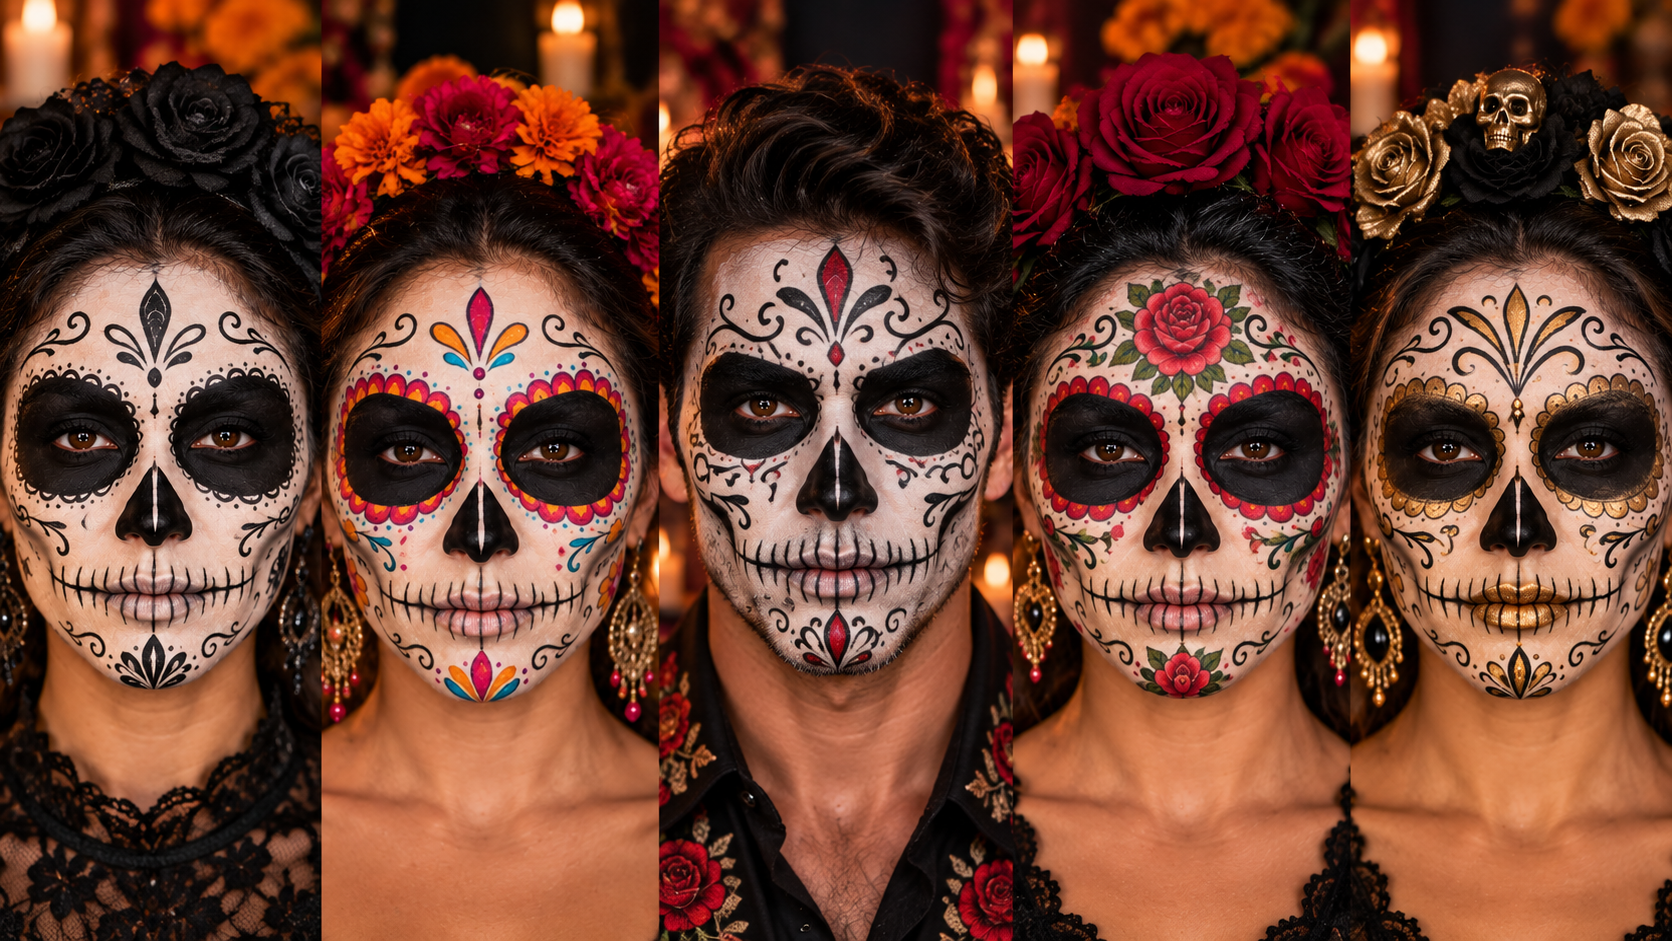
One of the best things about sugar skull makeup is the freedom to interpret it.
You can create enormous black eye sockets or surround the eyes with painted flower petals. You can use delicate lines or heavy black shading. You can add roses, marigolds, spiderwebs, hearts, crosses, gems, rhinestones, or nothing but black and white.
And despite what a close-up photograph on Instagram might make you think, the face does not have to be perfectly symmetrical.
It should feel balanced and intentional, but you do not need to spend half the evening trying to make one flower the same size as the one on the other side.
Balanced is important.
Perfect is not.
THE PART PEOPLE OFTEN GET WRONG: CHOOSING FACE PAINT
One of the biggest differences between a face that looks good for an hour and one that still looks good several hours later is the makeup itself.
Cheap costume makeup can require a very thick layer to create solid coverage. Once that product settles into smile lines and moves with the face, it can create the dry, cracked-mask appearance people often associate with bad Halloween makeup.
For large areas such as the white base, use a cosmetic-grade face or body product designed to cover skin.
Water-activated face paints are one option. They are highly pigmented, can be applied in thin layers, and are commonly used by professional face and body painters.
Another option is theatrical cream makeup, which can create an extremely opaque white base but generally needs to be set properly with powder.
The important lesson is simple:
You are trying to make the face white. You are not trying to build a thick white mask.
Good pigmentation lets you use less product, and less product usually yields cleaner results.
For fine details, I also prefer a black cosmetic pencil rather than painting every tooth, crack, and jawline with the same black face paint used to fill the eye sockets.
A pencil gives you much more control.
WHAT YOU’LL NEED
You do not need a giant professional makeup kit to create a good sugar skull face.
The basic supplies are straightforward: white cosmetic face paint, black cosmetic face paint, a black makeup pencil, brushes or sponges, optional colored face paints, and cotton swabs or makeup remover for correcting mistakes.
If you want to add rhinestones, gems, or glitter, make sure both the decorations and adhesive are cosmetic-safe and skin-safe.
BEFORE YOU PAINT: PLAN THE FACE
Before you start covering the face in white, think about the major features.
The four areas that matter most are the eye sockets, nose, mouth, and jaw, and any major decorative elements.
You can lightly sketch those shapes if that helps.
I have used both approaches successfully. Sometimes I map the eyes and nose first and work the white around them. Other times I apply the white first and build the black areas afterward.
For beginners, I think it is easiest to think of the process as a progression:
Map the face → White base → Major black areas → Teeth and bone structure → Color and decoration → Shading and embellishments
You do not need to plan every dot and flower before you begin.
You just need a roadmap.
STEP-BY-STEP: HOW TO PAINT A SUGAR SKULL FACE
STEP 1: MAP THE DESIGN
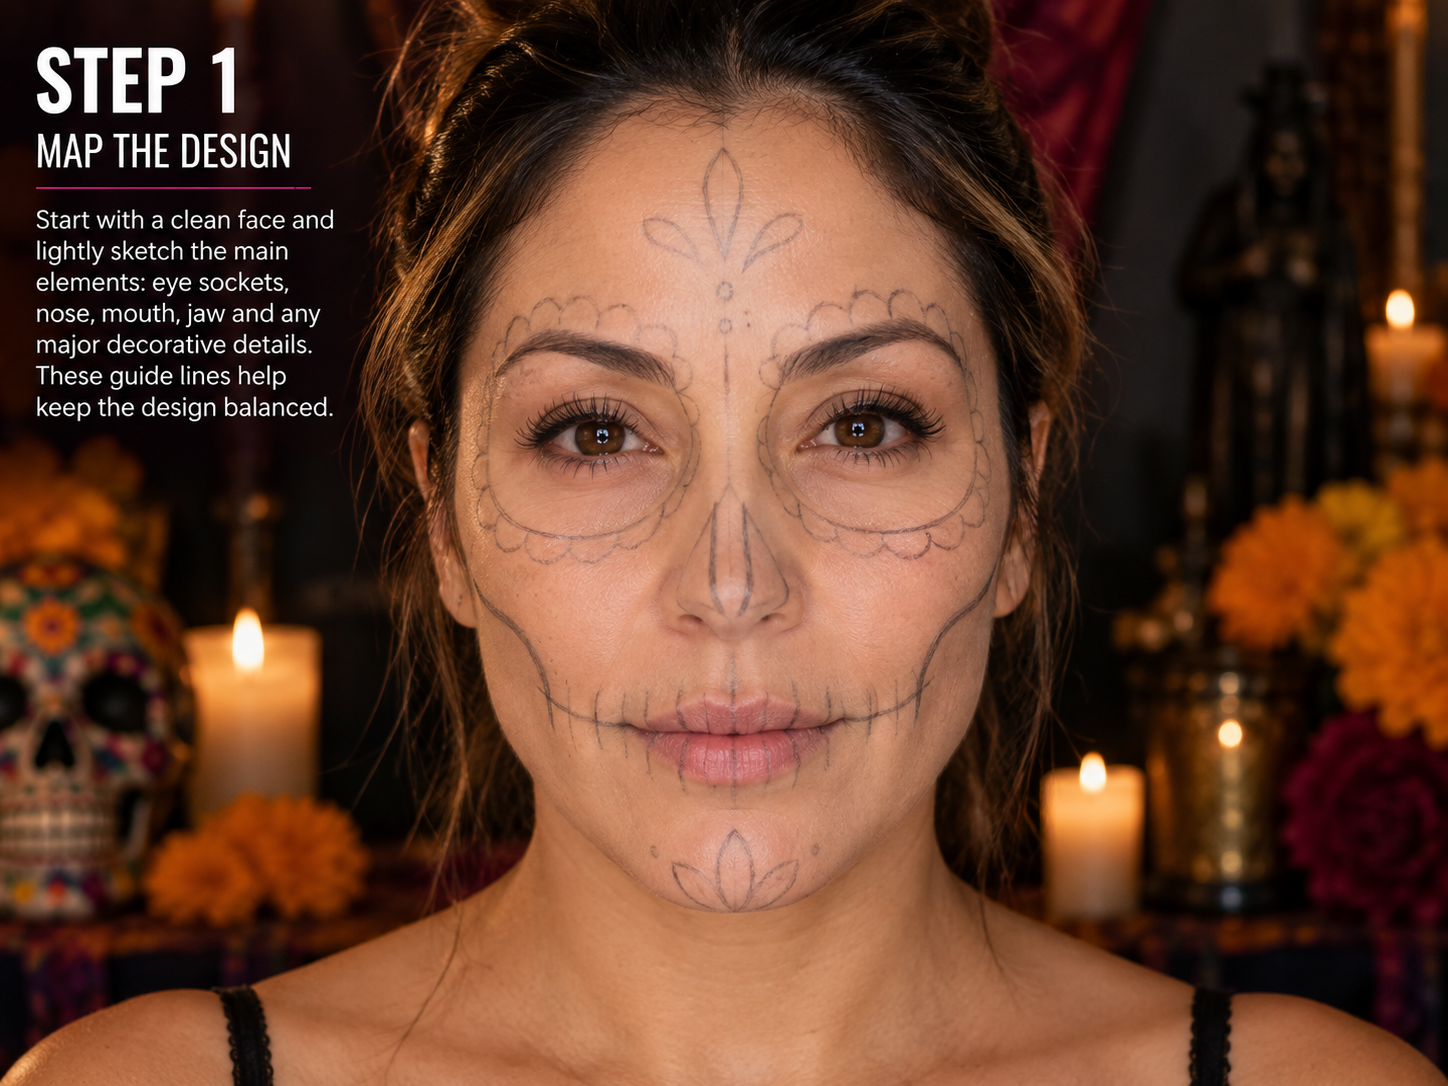
Start with an essentially bare face.
Lightly establish where the eye sockets, nose, mouth, jaw, and any major decorative elements will go.
Do not overdraw at this stage. You are simply giving yourself reference points so the finished design feels balanced.
STEP 2: BUILD THE WHITE BASE
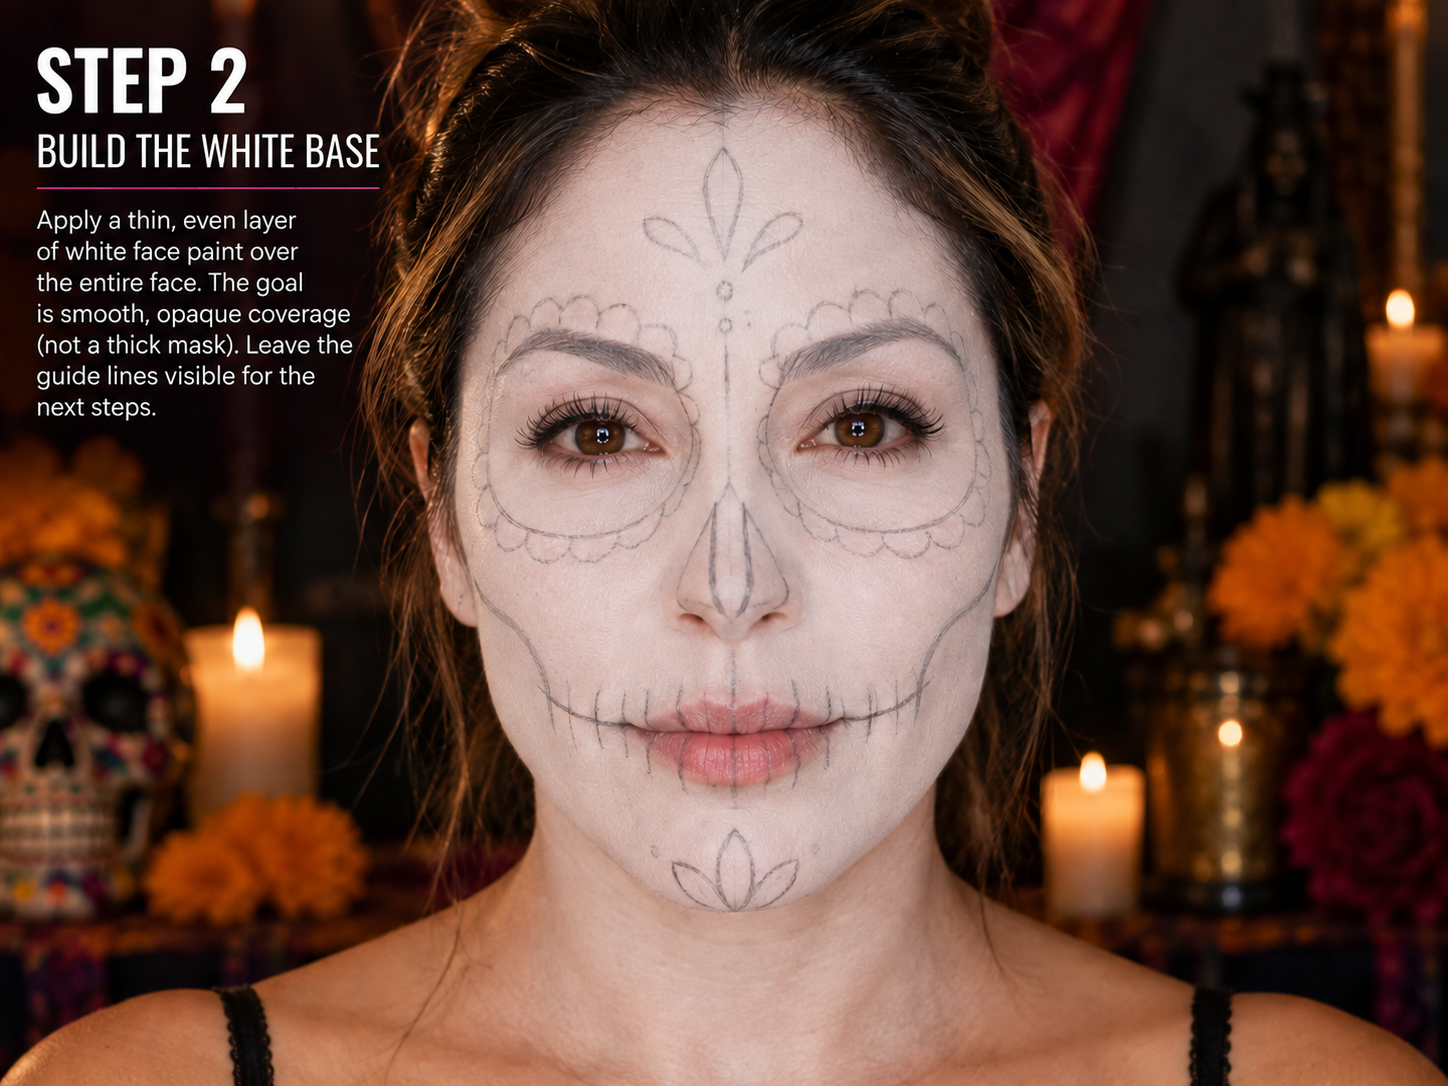
Apply the white evenly and relatively thinly.
The goal is to create an opaque white complexion, not a heavy shell of makeup.
Use a sponge or brush to build coverage gradually. Pay attention to the hairline, the sides of the face, and around the nose, where obvious gaps can make the makeup look unfinished.
If your product needs setting powder, follow the manufacturer’s instructions before moving on.
STEP 3: ADD THE MAJOR BLACK AREAS
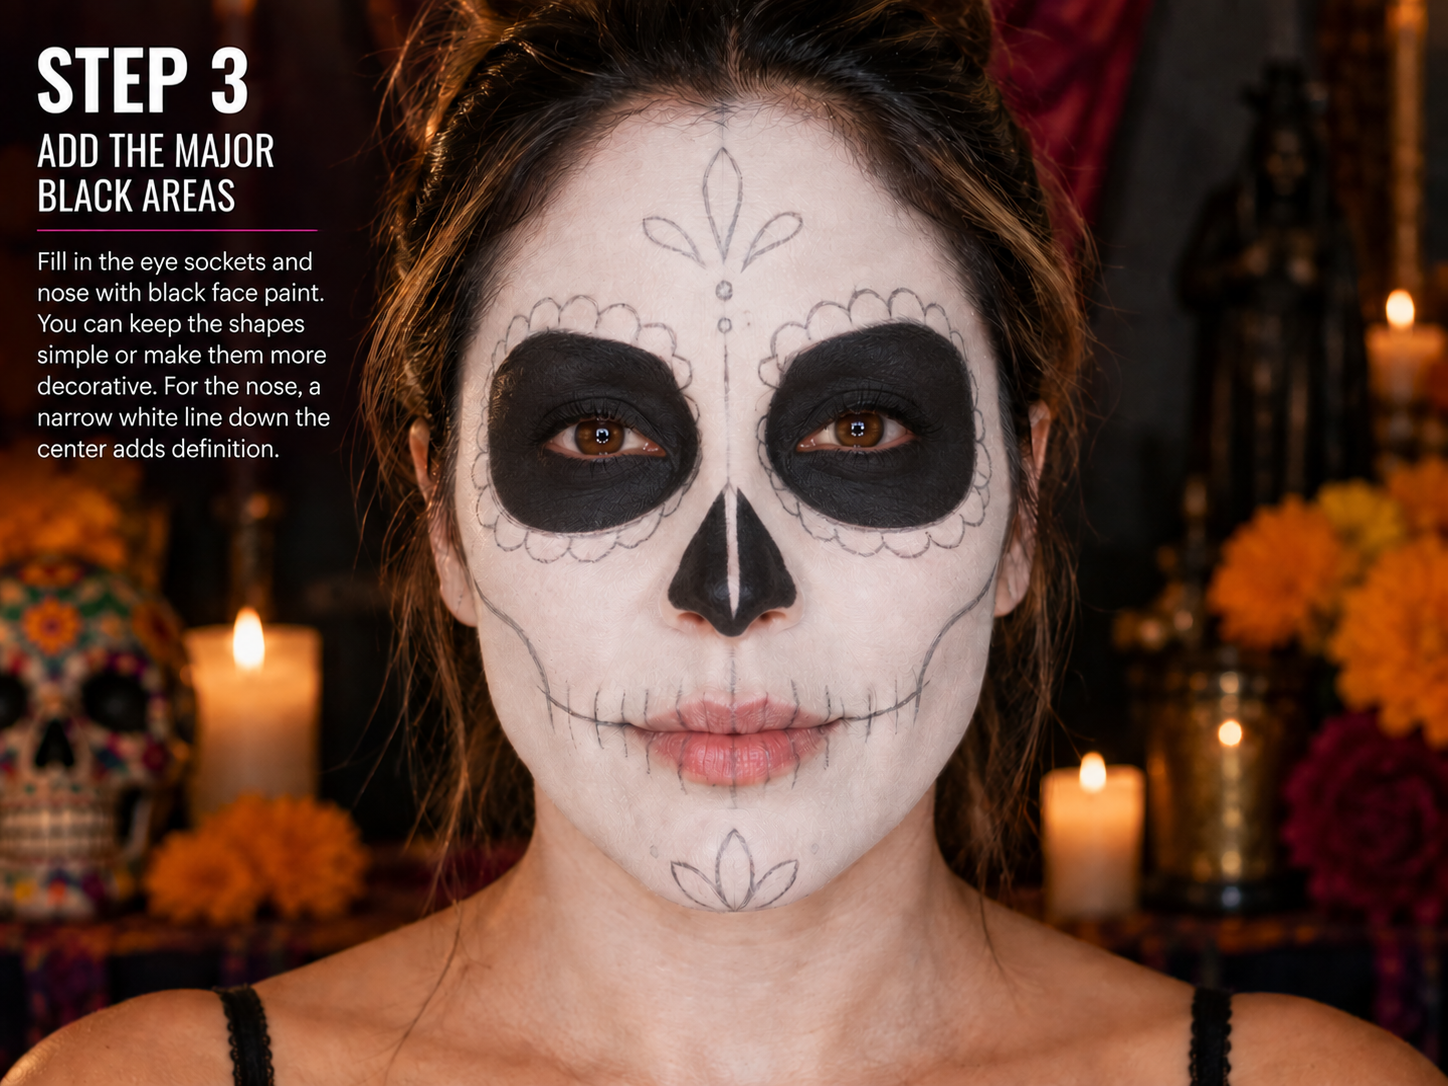
Now fill in the eye sockets and nose.
The eye sockets can be circular, oval, scalloped, or floral. There is no single correct shape.
Think about the entire orbital area, not just the eye itself.
For the nose, a solid black skeletal shape works, but I like leaving it as is or adding a narrow white line through the center. It breaks up the shape and gives the nose more structure.
This is the point where the face starts becoming a calavera.
STEP 4: CREATE THE TEETH AND BONE STRUCTURE
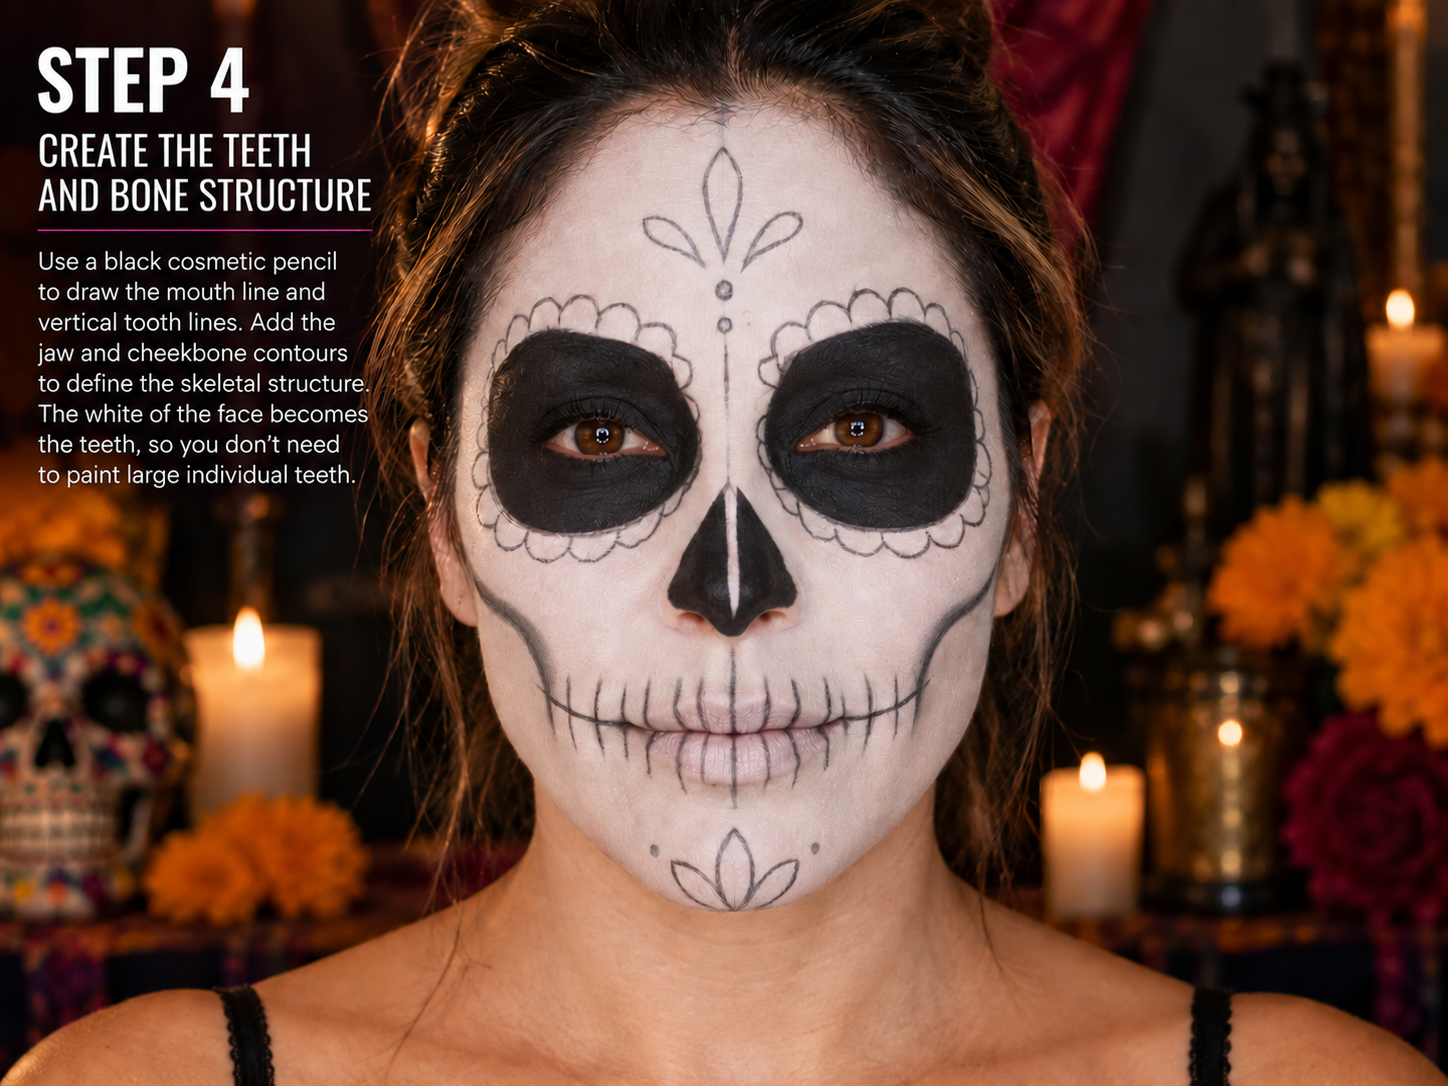
This is one of the easiest places for a design to go wrong.
You do not need to paint enormous individual black teeth.
The white that is already on the face can become the teeth.
Use a black cosmetic pencil to draw the mouth line and then add controlled vertical lines through it to suggest the spaces between the teeth.
From there, add the jaw line and skeletal contours.
A few carefully placed lines can suggest bone structure without turning the entire face into a cartoon skeleton.
This is one of those places where less is often better.
STEP 5: ADD COLOR AND DECORATION
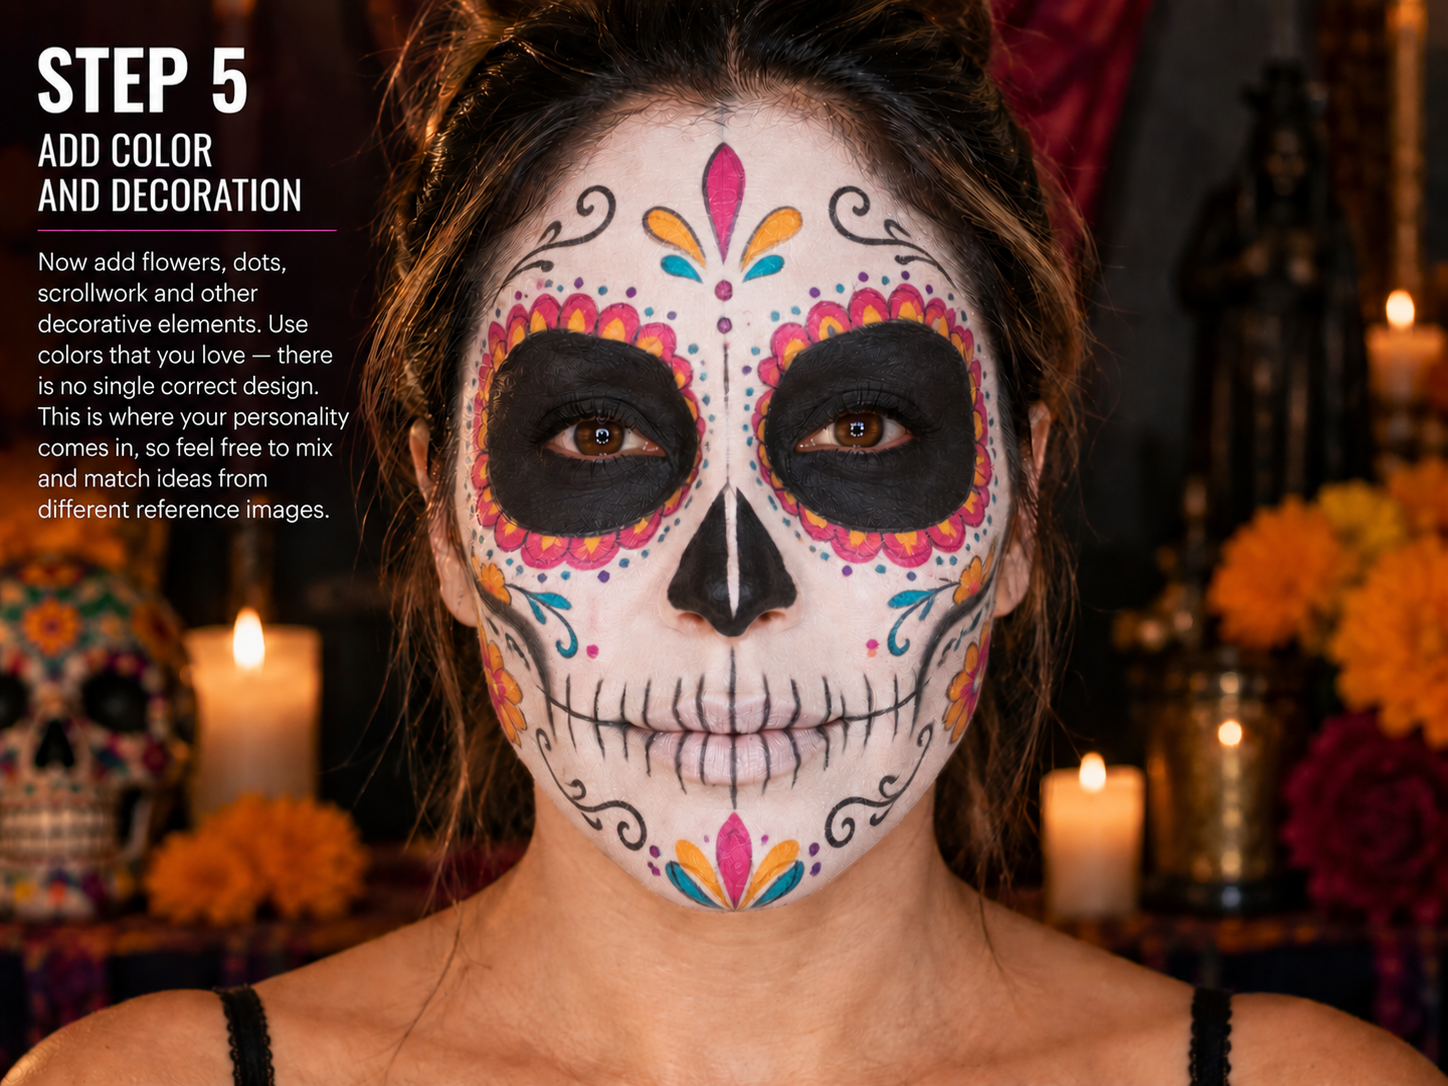
Now the personality comes in.
Add flowers, dots, scallops, scrollwork, hearts, spiderwebs, teardrops, crosses, or any other elements you want.
This is also where you can introduce color.
You might love the eyes from one reference image, the mouth from another, and the flowers from a third.
Use them together.
The goal is not to copy one design exactly. It is to create a face that looks intentional and feels like your own.
STEP 6: ADD DIMENSION
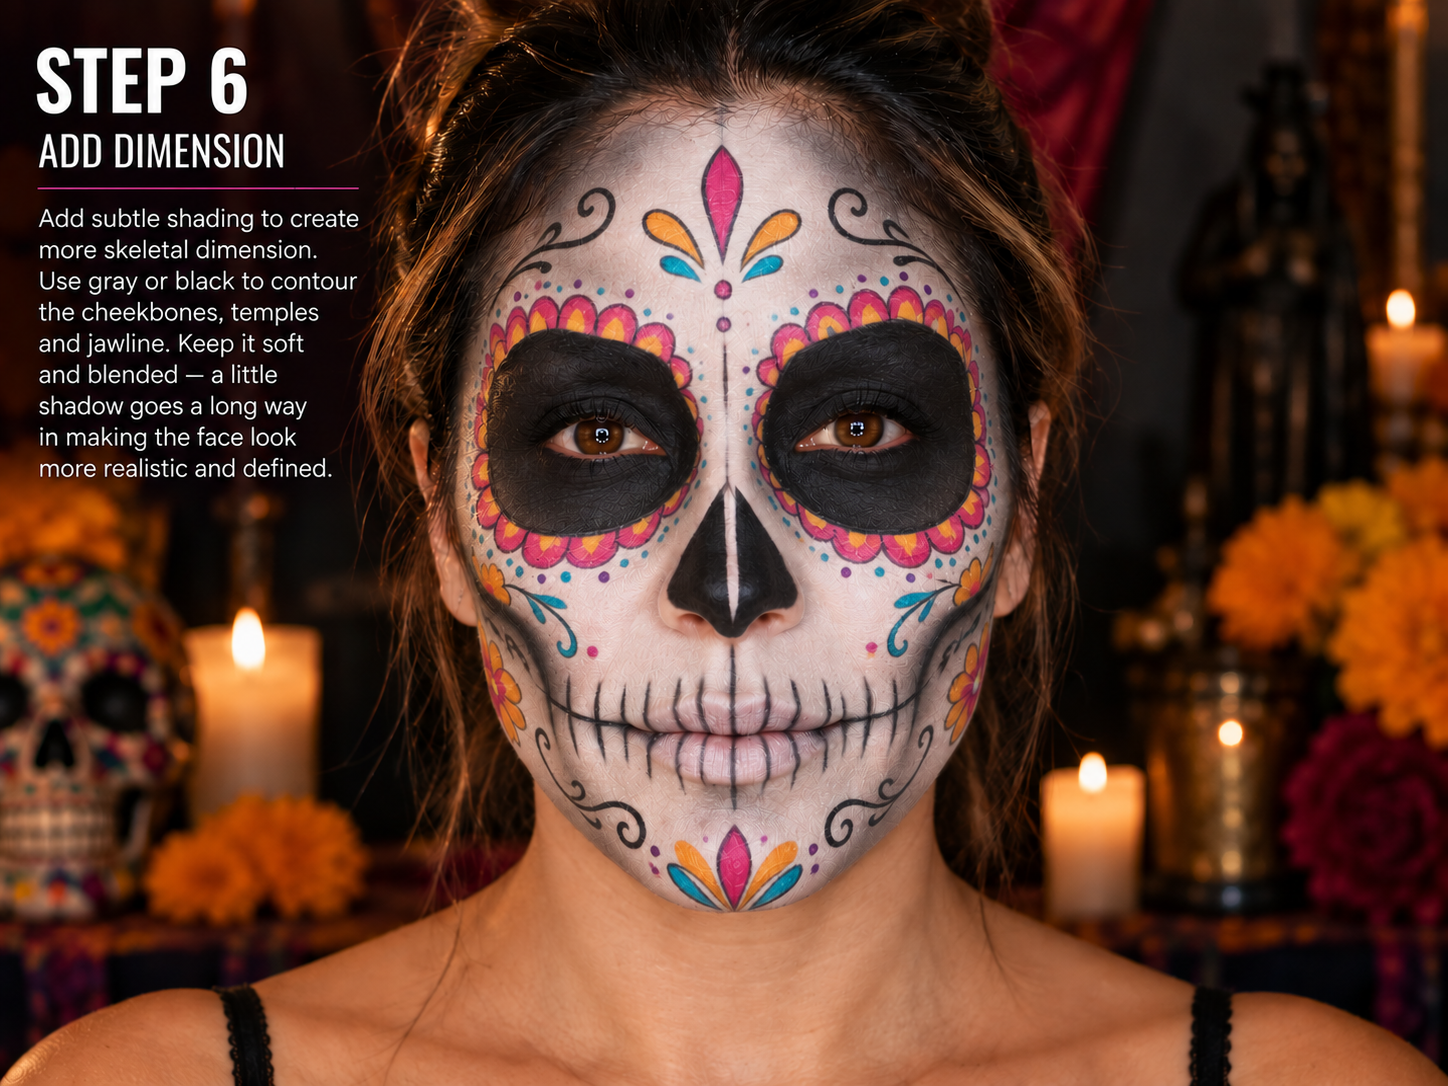
If everything is simply pure white beside pure black, the face can look very flat.
A little controlled shading around the cheekbones, temples, or jaw can create much more skeletal dimension.
Start lightly.
You can always add more shadow, but removing a large black streak is much harder.
STEP 7: EMBELLISH
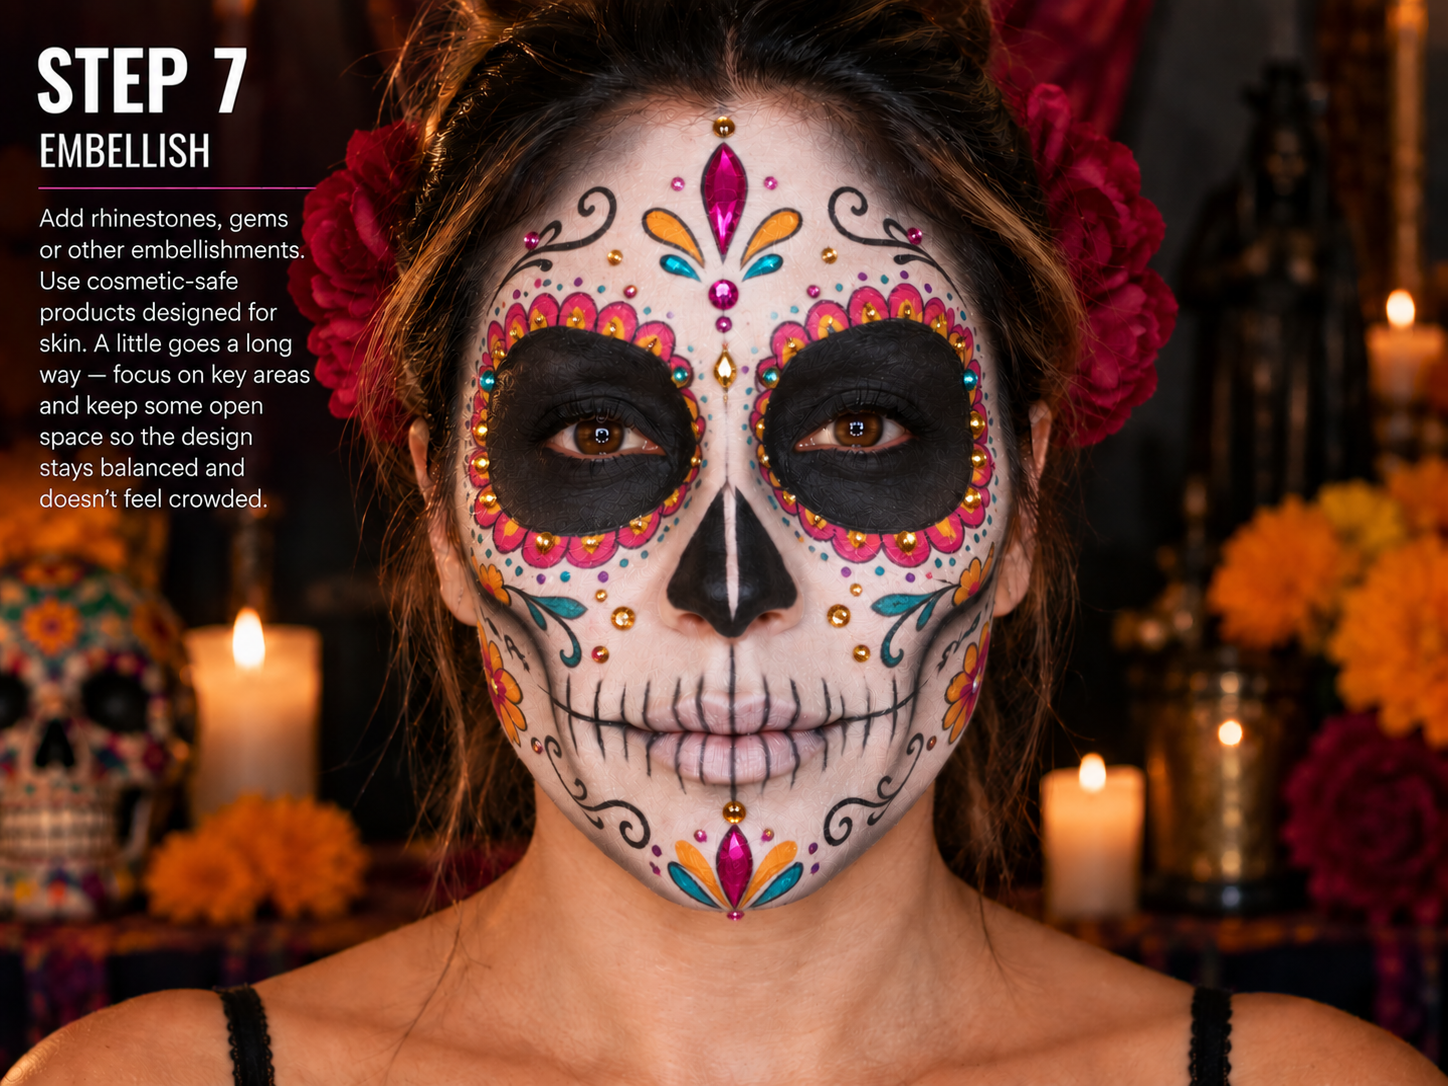
Rhinestones, gems, glitter, and flowers are all optional.
They can look fantastic, but this is also the point where people sometimes go too far.
Once you start decorating, every blank piece of white skin can suddenly look like a place to add something else.
You do not have to.
Leaving some open white space can make the detailed areas stand out more.
STEP 8: STEP AWAY FROM THE MIRROR
When people paint their own faces, they spend most of the process looking at themselves from six inches away.
Nobody else is going to see you that way.
When you think you are finished, step back several feet and look at the entire face.
Do the eyes feel balanced?
Is one side visually heavier than the other?
Can you still see the teeth?
Does the design read clearly from a distance?
Those questions matter far more than whether one tiny decorative dot is perfectly round.
Then clean up uneven lines, strengthen details that disappeared during blending, and set the makeup according to the products you used.
And you are finished.
COMMON MISTAKES THAT CAN RUIN THE LOOK
There are really only a handful of mistakes worth worrying about.
The first is using too much white makeup.
The second is trying to paint every detail with the same tool.
The third is creating thick black blocks where finer lines would look better, especially around the teeth.
The fourth is obsessing over perfect symmetry.
And the fifth is not knowing when to stop.
If the face already looks good, another forty rhinestones may not improve it.
MAKE THE DESIGN YOUR OWN
Use reference images for inspiration, but do not feel like you have to duplicate one exactly.
Maybe you love the eyes from one face, the teeth from another, and the colors from a third.
Combine them.
Once you understand the basic structure—white base, eye sockets, nose, teeth, bone structure, and decoration—you can create a sugar skull face that looks completely different from anyone else’s.
And that is really the goal.
DON’T WANT TO PAINT YOUR OWN? WE’LL DO IT AT NAUGHTY HALLOWEEN
At Naughty Halloween, a professional face painter will be available for a reasonable additional charge.
That can turn into one of the easiest costume options of the entire weekend.
Wear the clothing you want.
Have your face professionally painted.
And you are ready for the night.
PAINT ALONG WITH US AT NAUGHTY HALLOWEEN
If you want to learn how to create the look yourself, join us for our optional sugar skull face-painting class (there is a charge to cover the painting supplies). Click here to sign up
We will have someone painting someone’s face from beginning to end while everyone follows along, either working on themselves or with a partner.
Supplies will be provided for those who sign up for the optional class, but availability will be limited.
We will go through the entire process together:
Map the face → White base → Major black areas → Teeth and bone structure → Color and decoration → Shading and embellishments → Finished face
Once the model’s face is finished, the teacher will move around the room and help participants with their own designs and finishing details.
And remember:
The goal is not for everyone to walk out looking the same.
We will show you the structure and the techniques; it is up to you to be creative.
Once you understand those, you can create a calavera that looks completely different from everyone else.
If you buy your own supplies, you can come to class, listen, and follow along for free.
WHAT YOU’LL NEED
You don’t need a professional makeup kit to create a great sugar skull. A few quality products and basic tools are enough:
For someone starting from scratch, these are the supplies we would recommend:
White face paint — the most important purchase. My first choice for a beginner would be Ben Nye Clown White Lite. It is highly pigmented but lighter and easier to work with than traditional heavy Clown White. Ben Nye recommends applying it with a sponge or synthetic brush and setting it with powder. An excellent water-activated alternative is Mehron Paradise Makeup AQ White. Water-activated paint is particularly nice when you want thin layers rather than a heavy cream base.
Black face paint. Mehron Paradise Makeup AQ Black is an excellent choice for the large black areas around the eyes and nose. Mehron specifically uses Paradise AQ Black and White for skull makeup, so this isn't just a generic recommendation.
A color palette. Instead of buying six or eight individual colors, Mehron Paradise Makeup AQ Palette gives someone enough colors for flowers, eye petals, dots, scrollwork, and accents. This is where I'd spend a little more rather than buying a $10 Halloween face-paint kit.
A fine black cosmetic pencil. This is the item I think will make your tutorial particularly useful. NYX Epic Wear Black Liner is readily available. Use the pencil for the mouth line, individual tooth divisions, fine skeletal lines, and small details. Don't try to do all of that with the same brush you used to paint the black eye sockets. Ben Nye likewise recommends a black cosmetic pencil for fine outlining and detail work in character makeup.
Sponges and brushes. Real Techniques Miracle Complexion Sponge works well for stippling and smoothing the white base. Then I'd buy an inexpensive but decent synthetic brush set containing a small flat brush, medium flat brush, fine round/detail brush, and slightly larger blending brush. They don't need $30 artist brushes—the paint matters much more than having expensive brushes.
Setting powder — if you're using cream makeup. If someone chooses Ben Nye Clown White Lite, setting it is part of the process. Ben Nye recommends Neutral Set, Super White, or Colorless Luxury Powder; Super White intensifies a white base while Neutral Set doesn't substantially change its color. This matters because water-activated paint and cream makeup don't set the same way.
Cosmetic gems and skin-safe adhesive. Ordinary craft glue does not belong on someone's face. Mehron AdGem Latex-Free Adhesive is made specifically for attaching gems, rhinestones, glitter, and similar decorations to skin; Mehron describes it as latex-free, water-resistant, and intended for long-wear cosmetic applications. Buy flat-back cosmetic rhinestones in a few sizes rather than one enormous package of identical stones.
Cleanup supplies. Keep cotton swabs, cotton pads, makeup-remover wipes, and micellar water nearby while you work. A cotton swab with a tiny amount of remover is essentially an eraser for a crooked line or misplaced dot.